Video Transcript
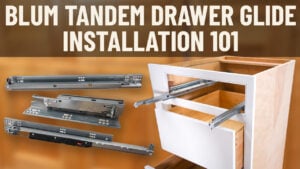
Hey everybody, Brian here from The Cabinet Joint. Today we're doing a quick video just to show you how to adjust your Blum Tandem Drawer Glides. Once you've installed your drawer, you're going to get these gaps, especially on inset drawers, where you might get some gaps that you want to adjust out so everything's even.
Blum has done a nice job of building in three-way adjustability—or we could call it six-way. You can go left and right, you can go up and down, and the back of the drawer can tilt up or tilt down, which will change the facial plane. And then, of course, if it's inset, you have the Tenex brackets on the inside that you can loosen up and move the drawer forward and back if you want. So you have a lot of adjustments to dial in these minute adjustments to get everything to look just the way you want.
So in this case, I've exacerbated a problem here. We put the drawer front on, and oh my gosh, we have a tight gap here and a big gap there. We're tight at the bottom, and we're gappy at the top. How do I adjust that out? Well, I'll show you in a moment, but Blum has built in the adjustments with these wheels on the bottom of the drawer. These wheels, and if I spin the wheel one direction, you can watch it right here close up, the gap closes down. So as it goes like that, you can see that gap got much bigger.
So those two wheels, when you spin them in the same direction underneath, you can watch the drawer go left or right. On the up-down, before I put this down, there's a lever right here. If I push this lever in, so this bracket is sitting like this, if I push that lever in or pull it back out— all the way out is all the way down. If I push it in, it'll raise the drawer up. So I'm going to go ahead and adjust this one real quick. You'll see what I mean.
So first thing I'm going to do is do my in-out adjustment. I just push those two brown or gray levers in, and now I'm getting pretty good here. I’ve got to go in a little more on this one. Okay, I got a gap that might be a little too high.
So now I've got a gap top and bottom I like on both sides, but now I have this super tight and super big gap on this side. So I've got to move this one over. So I spin my drawer glide adjuster wheels, and now I have a nice gap here. Maybe still a little wide there, but I can play with that. But you can see how this drawer is now much more centered in its opening. Really critical on inset, and you're going to want to fight with this after you've done your installation. Don’t fight with this while the cabinets are sitting on the ground after you've built them. Once you install them, they change. You want to get everything in place, attached to the wall, granite installed, then you put your doors and drawer fronts on, and you can make all these micro adjustments just fine.
So I'm going to go through after the fact and adjust these other two. Then, the last bit of adjustment is—let's pretend—your drawer front is tipping back, and this corner here is back inside the cabinet. You can raise the back using this little gray wheel. If I do that, you can watch this hook go up and down. So I just went up, and you can see that gap there, and now when I spin it the other way, it closes.
So what I'm doing is I'm raising and lowering the rear of the drawer box, and that can help with facial plane issues here, or if the drawer box, when you install it, your cabinet isn’t perfectly level, and you shut your drawer and you're like, “Oh, it's rolling back out on me,” that means the drawer is tipped too far. You're going to adjust some things that way.
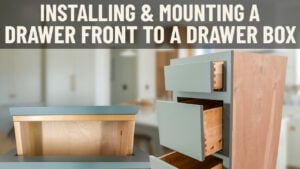
Your last bit of adjustment with inset comes in the form of—pop the drawer out. And to do that, by the way, folks, you just grab those two orange clips, just give them a squeeze at the same time and pull the drawer all the way out. It'll release the drawer glide and allow you to lift the drawer box off.
But the last bit of adjustment comes on inset with this screw right here. If I loosen that screw, the track will now slide in and out. So if I see my drawer front is a little proud or a little too far sunk in, I can adjust my depth with those two screws. Now, that is predicated on the fact that you've got rear angle brackets supporting the rear of the glide. It's on like a T-slot, so it will allow you to push and pull the glide in or out. If you're dealing with a 12-inch deep cabinet, a 27, or a 30, you don’t use those brackets. We referenced that in our Blum install video—the Blum Tandem install video. Instead, you're going to have blocks of wood that flush this out, and the cabinet is screwed right to the cabinet wall.
You're going to need to loosen up those screws, take them out, find a new hole, use the elongated slot, whatever. But to get this to go in or out, if you're not using those angle brackets at the back, you've also got to remember to release these screws that are holding it to the cabinet wall. And then, once you have it where you want it, it's just as easy as setting the drawer—being careful not to bang your frame. Set the drawer back on the glide, it's just kind of floating there, and if I push it in until it clicks firmly, you can kind of hear an audible click. That's all it takes, and your Blum Tandem Glides are back in business.
So if you ever have questions, your cabinet coaches are there to answer them. This is pretty run-of-the-mill stuff. We do find that we get a lot of questions, even more on hardware than we do on how to build a box. The hardware can really drive you nuts if you're not paying attention to these adjustments. So if you have any questions, give your cabinet coach a call at 888-211-6482.
Thanks for watching, everybody!


I’m having a problem with the adjustment Please call me for help figuring it out at 847 212-8668
Hi Robin, please kindly contact your cabinet joint sales rep for support. However, we cannot seem to find any order for you, so we are assuming you placed your cabinet order elsewhere, in which case you would be best served by contacting your supplier for support. Thanks!
HI
We have the Blum slides and the soft close function is not working.
Any fixes available?
The glides have a lifetime warranty, so we would recommend contacting Blum for a replacement if outside the Conestoga warranty.
Hi,
One of my drawers slides all the way in but then pops out about 1/2″. Any ideas? I watched the video and tried a few things but still pops back out.
Thanks.
Hi, Dan. I can’t seem to find a project on file with us, so I would suggest contacting who you bought the cabinets from for assistance with this.
Hi Brian,
We are building inset cabinets. Is there an in/out adjustment? Our drawer boxes are not even so the drawer front sticks out on one side and is not flush.
Kathleen
Hi Kathleen,
To adjust the drawer box in and out, remove the drawer box from the cabinet to access the inset mounting blocks. Loosen the screw that attaches the drawer glide to the mounting block. Then you can adjust the drawer track in and out to make the drawer front flush with the front frame. Once the slides are readjusted, tighten the screw and place the drawer box back on the glides. This video beginning at 10 min 25 sec shows this process.
Hi! One of my drawers doesn’t close itself all the way in by itself, it stops absout 1,5 cm before the most closed position. It is possible to close it by a small touch though. Any ideas?
Hi Kalle,
Thanks for your question. I cannot locate your job file in our system.
I would recommend you contacting the cabinet coach who assisted you with your project to figure out a way to fix the drawer glide issue.
To allow for more adjustment on the front of the drawer box, does it make sense to move the gray lever to the middle position so it can also be lowered if mounted too high? Just want to make sure there isn’t a downside. Thanks.
Hey Peter thanks for your question – I don’t see any significant issues with your proposed approach, however, you get more adjustment ‘travel’ when you start fully justified one direction or another. Also, in our experience, it is uncommon to need to adjust every drawer this way, so we find it simpler to manage the exceptions rather than the rule. Thx!
Thanks for the video. You saved my bacon when I had to remove a drawer. The adjustment tutorial was spot on.
Two of my drawers no longer “soft close” and the installer is no longer around to help with this to instruct or adjust the settings. Please share how to fix this problem to avoid a slam in these two drawers.
The glides have a lifetime warranty, so we would recommend contacting Blum for a replacement.